Finally it’s here; a clear answer to the question I get asked most. Or well, ‘are you single’ is actually the most aksed question but I’m not gonna dedicate an entire blogpost to that. –with one cat I’m already on my way to becoming a crazy catlady- So in this post I’m gonna tell you how I edit my pictures.

Filters; we can’t live without them anymore. Almost everyone has their favourite which they always use. We’re so obsessed with those that we are genuinely offended when our friends post a picture of us with the ‘wrong’ filter. How dare they? It’s really clear that mayfair doesn’t look good with your hair color, right?
Have you ever taken a moment to think about what a filter really is? It’s more than just a ‘layer’ that you put on your picture. A filter changes the lighting, the contrast, color and much more. I barely just throw a filter over my pic for 100%. I’d rather slightly use the filter to then manually play a bit with for example the lighting.
For this I use my fav app: VSCO-cam. The filter I mainly use is A5. This one isn’t instantly in the app but you have to ‘buy’ it. Don’t worry though cause it’s free! I think A5 creates a nice color. Does that mean that from now on you should use this filter? Absolutely not, Choose a filter which suits your style. My tip is though to use (mainly) the same filter if you want a balanced out feed.
The filter alone isn’t enough though –uh oh- cause you can do much more to improve your picture. Was it quite dark when you took the pic? Play with the lighting and light it up a bit. Take a look and see what happens when you change the contrast, the sharpness or warmth. This will differ with each picture and the outcome depends on your preferences.
If you scroll back through my feed you’ll see that my way of editing drastically changed. I used to really light up my pics cause I wanted a very light feed. Nowadays I find it much more important to keep the colors and shades in my pic so I don’t light them up as much as I used to. It all depends on your preferences and these can change over time. The more you practise, the better you’ll get at editing your pictures.
Oh and not to forget; that white border around my pics. I use the app Aviary for this. Is this the best one? I’ve got no idea. This happens to be the first editing app I ever downloaded and I’m too lazy to go look for another app just for that tiny border.
Writing this post made me realize that telling you which filter I use isn’t gonna help you that much further. A good pic is so much more than just a filter. That’s why a post will follow on how to take good pics and how to look good on them. Stay tuned!
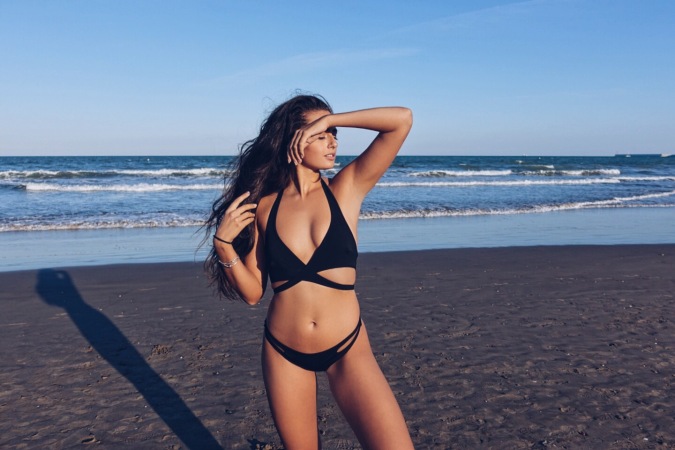
Oh and to show you that editing a picture is more than just throwing a filter over it; At the end of this post (so under the Dutch version) some examples of pictures with the same filters but edited differently when it comes to lighting, warmth etc. Definitely worth the scrolling😉
Nederlands
Eindelijk is ie er dan; een duidelijk antwoord op de vraag die mij het meest gesteld wordt. Naja ‘ben jij single?’ Is eigenlijk de meest gestelde vraag maar daar ga ik geen hele blogpost aan wijden. -ben met 1 kat al aardig op weg om een crazy catlady te worden- Dus in deze blogpost vertel ik je alles over hoe ik mijn foto’s bewerk.
Filters, we kunnen niet meer zonder tegenwoordig. Bijna iedereen heeft wel een standaard filter die ze gebruiken. Deze hebben we zo lief dat we ook oprecht beledigd zijn als onze vrienden een foto plaatsen van ons met de ‘verkeerde’ filter. Hoe durven ze wel niet? Het is toch duidelijk dat mayfair niet bij jouw haarkleur past?
Heb jij ooit dieper nagedacht over wat een filter nou precies is? Het is dus meer dan een ‘laagje’ dat zomaar over je foto geplakt. Een filter veranderd de belichting, het contrast, de teint en nog veel meer van je foto. Ik gooi dus ook bijna nooit een filter voor 100% over mijn foto’s heen. Liever gebruik ik de filter matig om daarna met de hand nog wat te spelen met bijvoorbeelde de belichting.
Hiervoor gebruik ik mijn favo app: VSCO-cam. De filter die ik dan standaard gebruik is A5. Deze filter zit niet gelijk in de app maar moet je ‘kopen’. Maar maak je geen zorgen want hij is helemaal gratis! Ik vind dat A5 voor een mooie kleur zorgt. Moet je dan vanaf nu altijd deze filter gebruiken? Nee hoor, kies een filter die bij jou past. Wel geef ik je als tip mee dat als je een rustig ogende feed wil het handig is om (bijna) altijd dezelfde filter te gebruiken.
De filter alleen is niet genoeg -uh oh- want je kunt dus nog veel meer doen om de kwaliteit van jouw foto te veranderen. Was het nogal donker toen je de foto nam? Speel eens met de helderheid en licht m wat op. Kijk ook eens wat er gebeurd als je het contrast veranderd, de scherpte of warmte. Dit zal verschillen per foto en hangt ook af van jouw voorkeur.
Als je terugscrollt door mijn feed zie je dat mijn manier van bewerken beduidend is verandert. Vroeger lichtte ik de foto’s ontzettend op want ik ging dan ook voor een hele ‘lichte’ feed. Tegenwoordig vind ik het belangrijker dat de kleuren etc goed uitkomen dus licht ik de foto’s wat minder op. Dit hangt allemaal af van jouw voorkeur en kan dus ook veranderen naarmate je jouw editing skills meer ontwikkeld. Oefenen baart kunst, in dit geval letterlijk. Na wat editen zijn jouw foto’s toch best museum waardig?
Tot slot; de witte rand om mijn foto’s. Hiervoor gebruik ik de app Aviary. Is deze de beste? Ik heb geen flauw idee. Toevallig is dit de eerste fotobewerkings-app die ik ooit downloaden en ik ben te lui om een andere app te zoeken voor dat mini randje.
Maargoed eigenlijk ben ik tijdens het schrijven van deze post tot de conclusie gekomen dat welke filter ik gebruik je niet heel veel verder zal helpen. Een goede foto is zo veel meer dan die ene filter. Daarom zal er ook een post volgen over hoe je die perfecte foto dan moet maken en hoe je zelf goed op de foto staat. Stay tuned!
Oh en om nog even te laten zien dat het bewerken van je foto meer is dan een filter eroverheen gooien; voorbeeldje met een paar keer dezelfde foto, zelfde filter maar andere belichting, warmte etc.
Please note that all of these pics have been edited with the same filter. The reason they look different is cause I either lighted them up or took the light away, made them warmer or cooler etc. The reason why editing is something you’ve got to learn is cause it’s different for each pic. I can’t tell you what to do exactly. Some pictures are dark and need to be lighted up, other pictures are really light already an lighting them up takes away all the color. The more you try the more you’ll understand how pictures will ‘react’ to editing. Now go practice a bit!


